Still need help?
Talk to a real person. Mon-Fri, 7:30am to 4:00pm PST.
Chat With Us
Message one of our team members for help.
Sticker sizes vary depending on the design. Most of our stickers are available in custom sizes. The size of each sticker is displayed in the description next to the sticker in the shopping cart.
All of our stickers are custom-made, so most orders are processed and shipped within 5-7 business days. Production time for bulk orders depends on the quantity ordered. If you live outside the United States, please allow 2 to 6 weeks for delivery, depending on customs and your chosen shipping method.
Absolutely not! Our stickers can be applied to any smooth surface. Popular options include cars, trucks, boats, RVs, motorcycles, skateboards, bicycles, helmets, laptops, and much more!
Reordering stickers from a previous purchase is simple. Just log in to your account and click on the "Orders" button located to the right of the search bar. In the Order History tab, find the order you want to reorder and click the green "ReOrder" button. This will add all the items from that order to your current shopping cart, where you can adjust the quantities as needed.
No, once a sticker has been applied, it cannot be reused. After removing the sticker, it will no longer adhere properly and should be discarded.
California's Safe Drinking Water and Toxic Enforcement Act, also known as Proposition 65, was enacted in 1986 to protect residents and the environment from exposure to harmful substances, including chemicals that can cause cancer, birth defects, or other reproductive harm. To comply with Proposition 65, businesses must provide clear and reasonable warnings to individuals in California before knowingly and intentionally exposing them to chemicals identified by the state as hazardous. Our vinyl suppliers have indicated that their products contain chemicals such as lead, lead compounds, vinyl chloride, and toluene, which are listed by the State of California as chemicals known to cause cancer, birth defects, or other reproductive harm. For more information, please visit www.P65Warnings.ca.gov.
Do you have old or damaged stickers left on your car, water bottle, or laptop? At Carstickers.com, we use top-grade vinyl stickers with air-egress technology to make the removal process fast and simple. However, not all stickers are as easy to remove, so we've provided this handy guide to help you remove any sticker from any surface.
Before starting, it's important to consider the material your sticker is stuck on. Materials like glass or stainless steel allow for different techniques and tools compared to surfaces like a laptop or car door. For example, we wouldn't recommend using a box cutter or excessive window cleaner on car paint or electronics. While there are many unconventional methods out there, we've found that the following simple step-by-step techniques will remove almost any sticker.
Using a hair dryer or other heat source, heat the sticker slowly, starting in the middle and working your way out to the edges. Be careful not to heat the sticker too quickly, as you might accidentally burn or melt the adhesive onto the surface underneath.
Using a plastic card such as a gift card or hotel key, start at one corner and gently push the sticker off the surface. Apply enough pressure to remove the corner while maintaining a firm grip on the card.
Grab the corner of the sticker and pull it slowly towards the rest of the sticker. The lower the angle, the better. Pulling at a 90-degree angle increases the chance of ripping the sticker and leaving more residue on the surface.
After removing most of the sticker with heat and the plastic scraper, spray the area with window cleaner. Use wet wipes or a soft cloth to rub off the remaining adhesive. If you removed the sticker from car paint, buff the area with car wax.
For this method, you will need 90% or higher rubbing alcohol, cotton balls, and a plastic card or razor blade (use the razor blade only on hard surfaces like glass).
Dab the rubbing alcohol on the cotton balls until they are wet but not soaked. Rub the surface of the sticker until it begins to absorb the alcohol.
Let the sticker sit for 5 to 10 minutes while the rubbing alcohol soaks in. If the surface dries out, add more rubbing alcohol and continue to let it soak. Once ready, simply pull off the sticker!
Using your plastic card or razor blade, scrape off any remaining sticker and adhesive.
Uploading an existing image or design to create a custom sticker is easy! However, there are some common issues with uploaded files that can delay the production process. Follow these best practices to ensure a smooth experience:
When placing an image or file into your Illustrator document, make sure the file is embedded. With the placed file selected, check whether the image is Linked or Embedded in the top left corner of the document.
After designing your sticker in Illustrator or another design software, make sure your fonts are outlined. If artwork is submitted without outlined text, we may not have the fonts needed to print your design as intended.
If you're ordering a sticker where the only color in the design is white, you can choose between a white transfer sticker or a clear vinyl sticker with the design printed in white. Transfer stickers have the design cut out of a piece of white vinyl, with the background elements removed. Clear vinyl stickers have the design printed in opaque, white ink and can be die cut around the shape of your design or cut to a standard shape like a circle, square, or oval.
**In some cases, if a transfer sticker is too small to cut, we may recommend switching to a sticker printed on clear vinyl.
When ordering a sticker sheet, cut paths are signified by a 1 pt. stroke around your artwork. The stroke must be a spot color named 'CutContour.' For detailed instructions on adding cut paths to your artwork in Adobe Illustrator, view this short tutorial video.
If you want a sticker sheet but prefer not to set up your own cut paths, simply select the 'I need cut paths' option.
We often receive white artwork on a black background from customers looking to purchase a white transfer sticker. Please submit your artwork as a black image on a white background. After uploading your file, you'll be able to select the color of your sticker.
| Preferred Files | Not Preferred Files | Do Not Submit |
|---|---|---|
| .EPS | .JPG | MS Office Files |
| .AI | .JPEG | |
| .PSD | ||
| .TIF | .PNG | |
| .CDR |
You can check your file type by looking at the extension at the end of your file name. Example: transfer_sticker_file.eps
| Preferred Files | Not Preferred Files | Do Not Submit |
|---|---|---|
| .EPS | .TIF | MS Office Files |
| .AI | .CDR | |
| .JPG | ||
| .JPEG | ||
| .PNG | ||
| .PSD |
The lamination on vinyl stickers is 2.5 mil thick.
Yes, clear stickers are always laminated with a gloss finish to protect them and maintain their crystal-clear appearance.
Die cut stickers are custom stickers precisely cut around your artwork, giving the design its own unique shape. This creates a more polished and professional appearance compared to standard-cut stickers or decals. Die cut stickers are highly customizable and are especially popular among business owners for branding and promotional purposes.
The terms “sticker” and “decal” are often used interchangeably, but on our site, we use them to describe different types of products. Stickers are printed products made using full-color digital printing, while transfer decals are made by cutting designs out of solid color vinyl with the background removed. Each type is best suited for different applications depending on your design and surface.
Here’s a breakdown of each type and what makes them different:
Transfer decals are cut from rolls of colored vinyl using a plotter and have no printed ink or background. The finished design is applied using transfer tape, which helps keep everything aligned during installation. This makes transfer decals ideal for clean, professional lettering or logos. The examples below show designs cut from red, green, black, and pink vinyl. We offer over 40 colors of vinyl to choose from!


Printed stickers, such as die cut stickers are created using high-resolution digital printers and eco-friendly solvent inks. The design is printed directly onto white, clear, or specialty vinyl (like holographic), and then cut into any shape or size. Printed stickers are ideal for full-color artwork, photos, or detailed graphics with gradients or shading.
They’re a versatile option for both personal and business use and can be customized to fit almost any surface or style.


Our Printed Transfer Decals combine full-color printing with a background-free application using transfer tape—perfect for designs that need color and a clean, paint-like finish.
Lamination offers several benefits that help your stickers last longer. Our lamination is scratch-resistant and waterproof, providing a durable layer of protection. It also shields the print from fading due to UV rays, keeping your stickers vibrant and preventing damage over time.
Lamination is offered on the majority of our printed stickers, but some products, such as perforated film stickers and specialty material stickers like glow-in-the-dark, printed glitter, neon, and fluorescent stickers, are not laminated. This is because lamination can cause issues, such as hindering visibility on perforated film, blocking light on glow-in-the-dark stickers, and dulling the finish of specialty materials.
Transfer stickers are not printed but are made from a sheet of colored vinyl, so they do not require lamination.
Due to the production process of Multi-Color Transfer Stickers, lamination is not possible for these stickers.
We offer matte or gloss lamination for custom vinyl stickers. In most cases, you can choose the type of lamination you prefer. However, for certain products, we only offer one type to ensure your sticker looks as good as possible. For example, clear stickers receive a layer of gloss lamination because matte lamination reduces their transparency.
If you make a design using our design tool, that design can be saved for that product. If you'd like to go back to a saved design, simply go to the product page, choose your product options, and click "Choose Your Design." Then, if you have a saved design, "Continue editing a saved design" will be an option. If you select that option, you will then be able to choose from your saved designs for that product.
Lamination is a process that adds a protective layer to your sticker, enhancing its durability, strength, and appearance. At CarStickers.com, we apply a laminate layer to our printed stickers to make them scratch-resistant, weatherproof, and more resilient to UV rays. This extra layer can extend the life of your sticker by 1-3 years and comes at no additional cost. Lamination also allows you to choose between a glossy or matte finish, giving your stickers the perfect look.
We're proud to offer free lamination on all our stickers! In the past, lamination was an added cost, but we now include it at no charge because we believe in delivering the highest quality products to our customers. This added value ensures your stickers are not only durable but also look fantastic, whether you choose a matte or gloss finish.
Matte lamination provides a subtle, non-reflective finish that enhances the sticker's durability, UV protection, and weather resistance. It's perfect for a sleek, sophisticated look.
Gloss lamination adds a shiny, high-impact finish that's ideal for making your stickers stand out. It offers the same protective benefits as matte lamination but with a vibrant, reflective sheen.
We offer a wide variety of sticker materials to ensure you have the best choices for your sticker's look and feel. While not all materials are available for every sticker type, here's a comprehensive list of our sticker materials:
For more details on our material types, visit our Materials Page.
If you're using a website builder, you can easily add our link to your site. Start by downloading our logo, and then watch one of the instructional videos below for step-by-step guidance:
At Carstickers.com, we measure and price all our stickers based on square inches. To calculate the square inches of a sticker, simply multiply the width by the height. For example, a sticker that is 4'W x 4'H (4 inches wide and 4 inches high) and a sticker that is 2'W x 8'H (2 inches wide and 8 inches high) will cost the same because both are 16 square inches.
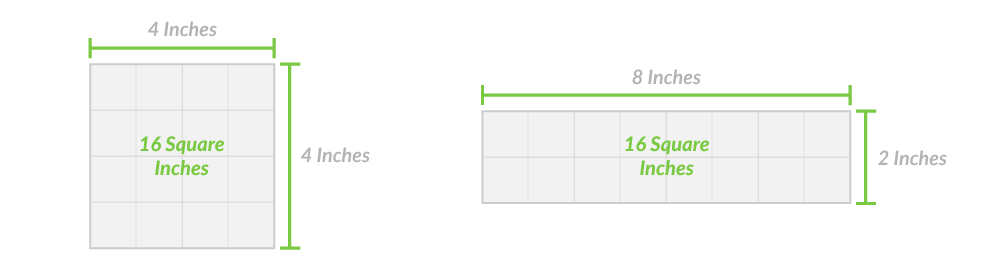
These measurements are based on the widest and tallest areas of the sticker's shape, measured from left to right and top to bottom in a straight line.
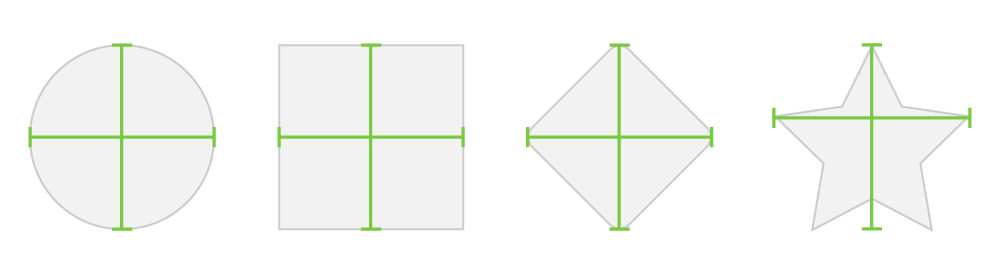
Please note: The measurements are taken when the design is upright and in the same position as it will be applied. This ensures that the sticker you order will fit in the intended space. For example, while a diamond-shaped sticker could theoretically be rotated 45 degrees and measured as a square, a 3'x3' diamond and a 3'x3' square rotated 45 degrees are not the same size and will not fit in the same space.
Vinyl stickers adhere best to smooth surfaces, including:
Vinyl stickers will NOT adhere well to:
Applying your stickers is easy! We provide detailed instructions on our Application Instructions page, and a set of these instructions will be included with each sticker order.
We asked the Sticker Experts - Joel and Jacob from CarStickers.com - some of the most frequently asked questions they receive about stickers. Learn all about sticker types, adhesive and material differences, application tips, sticker sizes, colors, and more!
Message one of our team members for help.
Subscribe for tips, offers, and product news! Plus, enjoy 10% off your next order!